"Scaling" Vagrant with NGINX Load Balancing
A load-balanced vagrant setup, because why the hell not! Not all projects require more that one instance of your application to handle the demand. When you do, you want to be prepared. You'll want to know which steps you have to take and which limitations you'll encounter. Let's get our feet wet.
Already know why you would use load balancing, skip to the good stuff. The entire setup is available on GitHub.
Why are we even doing this?
Vertical scaling (a bigger server) is often a viable solution when dealing with performance problems, but it might not be a future proof strategy. Given enough load, there won't be a box that's big enough. Rather than trying to defeat the big bad boss at level 24 with a giant ogre, try attacking it with an army of minions! This way we can add new servers (vm's) and increase the capacity of your platform. Distributing the load over multiple machines is referred to as "load balancing".
Our local development setup will never get so much load that load balancing is ever needed. This is merely an exercise for you to try out and get comfortable with this setup.
Balancing the load.
In order to make the most out of all the servers we have available a load balancer is put in charge of delegating the HTTP requests. Traffic is directed to one of the nodes in our network based on set criteria (we’ll dive into this later). Now all of the nodes are only responsible for a portion of the traffic. They will consume less memory and less cpu power than the single server setup. Let's look at how the requests flows through the platform.
- An HTTP request is made
- The load-balancer receives the request
- The request is forwarded to a node
- The response is returned to the load-balancer
- The load-balancer sends the HTTP response
There are a couple ways to do the actual distribution, each with their own characteristics.
Round Robin
With round robin, requests are offloaded to the first server, choosing the next server for each incoming request. For example, if we have 3 application servers and 5 http request, the offloading will be:
- App Server 1
- App Server 2
- App Server 3
- App Server 1
- App Server 2
This will go on endlessly. When one of the application servers goes down, and doesn't respond, the request is forwarded to the server next in line. If a request fails, that server will be given a timeout and tried again at a later time. During this timeout the requests will be handled by the remaining servers.
IP Hash balancing
Another mechanism for distributing is based on an IP hash. In this mechanism the user's IP address is used to determine which server handles the request. This ensures a particular server always handles requests for a particular user. This is useful if your application holds state the user relies on, like sessions.
Sticky cookies (/sessions)
Just like with IP hashing, requests from a particular client are routed to one machine within the network. The load balancer keeps track of users with a cookie
However, you'd be best to avoid relying on this strategy. The same goes for IP hash. In order to properly scale your application you want your application servers to be stateless. So sessions should be implemented in a cross-server way. It shouldn't matter which server handles the user's request. Additionally, with a large user-base this can also be the most expensive mechanism. The load-balancer needs to keep track of all the clients accessing the platform, it does this by storing a fingerprint of every user. This takes up space and larger lists are more costly to search in.
Least connection balancing
Using this mechanism requests are routed to the server with the least active connections. This is great because it also takes into account that some tasks a server does take longer. When this happens the amount of connections to a particular app server will remain higher, thus the request is routed to a different server. Perfect.
TL;DR
There are various mechanism used for load balancing. Some are good, some not so good. For this exercise we'll go with round robin load balancing. It's the default mechanism for NGINX.
Our load balanced setup.
There are multiple setups possible. For this setup we're going to have one load balancer in front of two application servers. As mentioned before, we'll use NGINX for the load balancing. The application servers will also be using NGINX. The application is going to be a simple PHP script echo'ing out the server's IP so we know which server we're actually hitting.
First step in our setup is our Vagrantfile:
Vagrant.require_version ">= 1.5"

Vagrant.configure("2") do |config|
    config.vm.define :loadbalancer do |loadbalancer|
        loadbalancer.vm.provider :virtualbox do |v|
            v.name = "loadbalancer"
            v.customize [
                "modifyvm", :id,
                "--name", "loadbalancer",
                "--memory", 512,
                "--natdnshostresolver1", "on",
                "--cpus", 1,
            ]
        end

        loadbalancer.vm.box = "ubuntu/trusty64"
        loadbalancer.vm.network :private_network, ip: "192.168.30.10"
        loadbalancer.ssh.forward_agent = true
        loadbalancer.vm.synced_folder "./", "/vagrant", :nfs => true
    end
end
This setup only spins up a VM for the load balancer. Additionally we'll want to add a loop which adds X number of application VM's:
(1..2).each do |i|
    config.vm.define "application_#{i}" do |application|
        application.vm.provider :virtualbox do |v|
            v.name = "application_#{i}"
            v.customize [
                "modifyvm", :id,
                "--name", "application_#{i}",
                "--memory", 512,
                "--natdnshostresolver1", "on",
                "--cpus", 1,
            ]
        end

        application.vm.box = "ubuntu/trusty64"
        application.vm.network :private_network, ip: "192.168.30.2#{i}"
        application.ssh.forward_agent = true
        application.vm.synced_folder "./", "/vagrant", :nfs => true
    end
end
Because Vagrantfile's are just ruby, we can loop over a range and declare multiple VM's without having to duplicate the statement several times. With a simple vagrant up we've now got three VM's at our disposal. Note that this configuration lacks any type of provisioning. We'll be provisioning these VM's with ansible. Not via vagrant's built in configuration, but from the "outside". Provisioning from the outside is not only easier, it's also similar to your production environment. We'll start by defining our inventory:
[loadbalancer]
192.168.30.21 ansible_user=vagrant ansible_ssh_pass=vagrant

[application]
192.168.30.2[2:3] ansible_user=vagrant ansible_ssh_pass=vagrant
In our inventory we have two groups; the loadbalancer group which contains one of the VM's, and an application group which contains the other two. I've used the [2:3] expression to prevent duplication. In our playbook we'll assign each of these groups the appropriate roles:
---
- hosts: loadbalancer
  become: yes
  become_method: sudo
  vars_files:
    - vars/all.yml
  roles:
    - nginx_proxy

- hosts: application
  become: yes
  become_method: sudo
  vars_files:
    - vars/all.yml
  roles:
    - nginx
    - php
The application group creates a standard nginx/php-fpm setup. Let's look at their NGINX configurations:
server {
    listen  80;
    root /var/www/public_html;
    index index.php;
    server_name example.com;

    location / {
        try_files $uri $uri/ /index.php?$query_string;
    }

    location ~ \.php$ {
        set_real_ip_from   192.168.30.21;
        fastcgi_split_path_info ^(.+\.php)(/.+)$;
        fastcgi_pass 127.0.0.1:9010;
        fastcgi_index index.php;
        fastcgi_param SCRIPT_FILENAME $document_root$fastcgi_script_name;
        include fastcgi_params;
    }
}
NGINX is listening on port 80 and forwarding all the incoming requests to port 9010 where php-fpm will be listening to handle the request. An interesting bit here is the set_real_ip_from section. This statement tells NGINX to use the X-Real-IP or X-Forwarded-For header in oder to determine the remote IP address. We'll be forwarding these headers in the load balancer.
The load balancer NGINX configuration is in charge of the actuall request offloading, and is surprisingly simple:
upstream application {
    server 192.168.30.22;
    server 192.168.30.23;
}

server {
    listen  80;
    server_name example.com;

    location / {
        proxy_set_header  Host             $host;
        proxy_set_header  X-Real-IP        $remote_addr;
        proxy_set_header  X-Forwarded-For  $remote_addr;
        proxy_pass http://application;
    }
}
In the upstream clause we've specified the two IP addresses we'll be offloading to. For all requests we proxy the request to the application upstream. Note the http:// prefix. If you're using ssl, change this to https://.
Each of the application nodes will have a simple PHP file which outputs some server information:
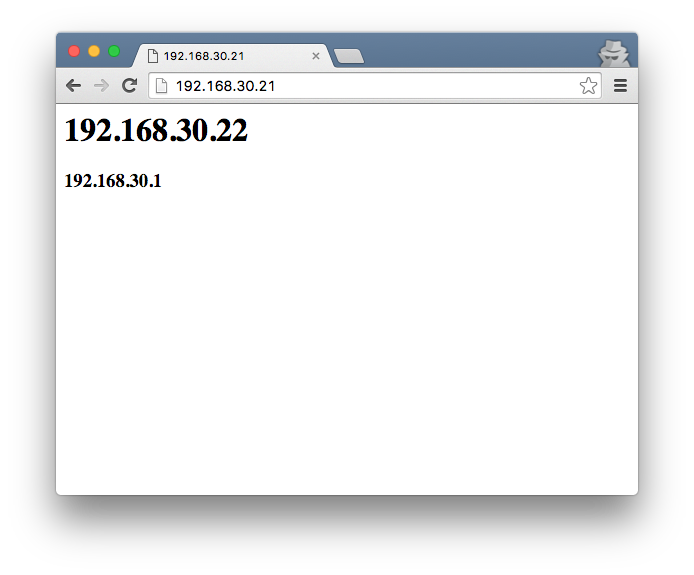
<h1><?=$_SERVER['SERVER_ADDR']?></h1>
<h3><?=$_SERVER['REMOTE_ADDR']?></h3>
Now that we've looked at all the important bits of configuration we're ready to provision the VM's.
$ ansible-playbook ansible/playbook.yml --inventory-file ansible/inventories/dev
After this is done we now have a load balanced vagrant setup consisting of 3 VM's. If you now open a browser, open up http://192.168.30.21/, you should see two IP addresses. The first is the server's IP address, the second is your local IP address. You can now go ahead and give that page a couple refreshes. You should be seeing the two server IP's alter. This indicates which server we've actually hit.
Now what?
Hopefully by this time you've seen it's relatively easy to setup a load balanced setup. You can now test if your application is written in such a way that load balancing is possible. Is your application stateless? Do sessions still work? Where are my user's files stored? These are all questions you'll be forced to answer now, and that's ok. In fact, it's amazing. We've now got our local development setup another huge step closer to the production environment. This means we'll face the same problems. Instead of potentially breaking production, we can now start fixing our application before switching to a multi-server setup.
Once again, the fully working configuration is available on GitHub. I hope this helps you to gain some confidence with load balancing.